At my previous job, I’ve been mostly teaching JavaScript foundations and some very basic backend stuff that I haven’t touched the front-end side or created a full-stack application for quite some time.
This year, I decided to start building my portfolio site from scratch, just in case that I want to market my skills to score some freelance works.
I’ve made a resume site before but it wasn’t built with a mobile-first approach and this time I want to have a resume site that showcases my projects. One problem is that the projects that I’ve made previously weren’t built with responsiveness in mind — it also doesn’t help that I felt disgusted whenever I looked at my old codes. So, I decided to make some new projects from scratch.
The idea
I wanted to build a simple app to showcase my ability to utilise APIs with a Node.js back-end and a React front-end. I found this video and decided to use the first API that he mentioned since it seemed interesting.
Spoonacular’s food API is quite robust. What attracted me to it is its random recipes pick and the ability to find recipes using the ingredients that a user already has. So, I decided to make a web app with those two features in mind.
I then used Figma to create a mockup of the app.
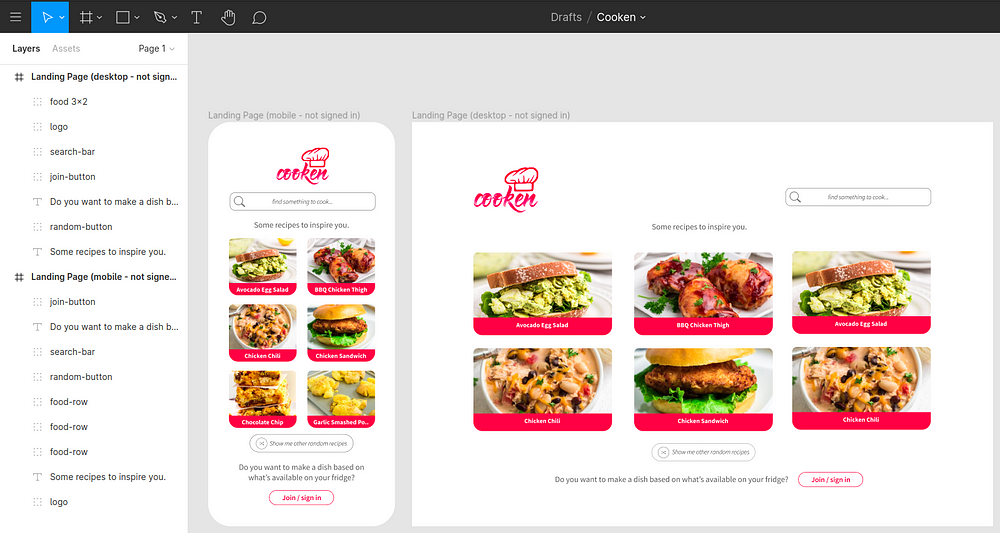
I had so much fun just designing the mockups of these two versions of the landing page. I wonder why I didn’t use Figma more in my past projects — the answer: I was in a bootcamp and there just wasn’t enough time to build professional-looking mockups or toy around with designs.
The first 10 hours: relearning the tools
I tried targetting Spoonacular’s API and it worked as intended, so I decided to start designing the home page of the app with React right away. I had to relearn React since it has been almost a year since I’ve used it. I watched some parts of Freecodecamp’s React Course and Dev Ed’s React State Management Tutorial just to refresh my knowledge.
I started creating the layout of the mobile landing page and it all went well until I had to make it responsive for the desktop version, where I was clueless about what to do — I’ve used Tailwind CSS before but it was quite a long time ago. So, I refer to Tailwind CSS’s official documentation to give me some ideas on what to do to make my website responsive.
Basically, I could decide which utility class to apply conditionally at different breakpoints, with unprefixed utilities (like uppercase) taking effect on all screen sizes, while prefixed utilities (like md:uppercase) only taking effect at the specified breakpoint and above. Tailwind CSS’s mobile-first approach was totally in line with how I wanted to develop my website.
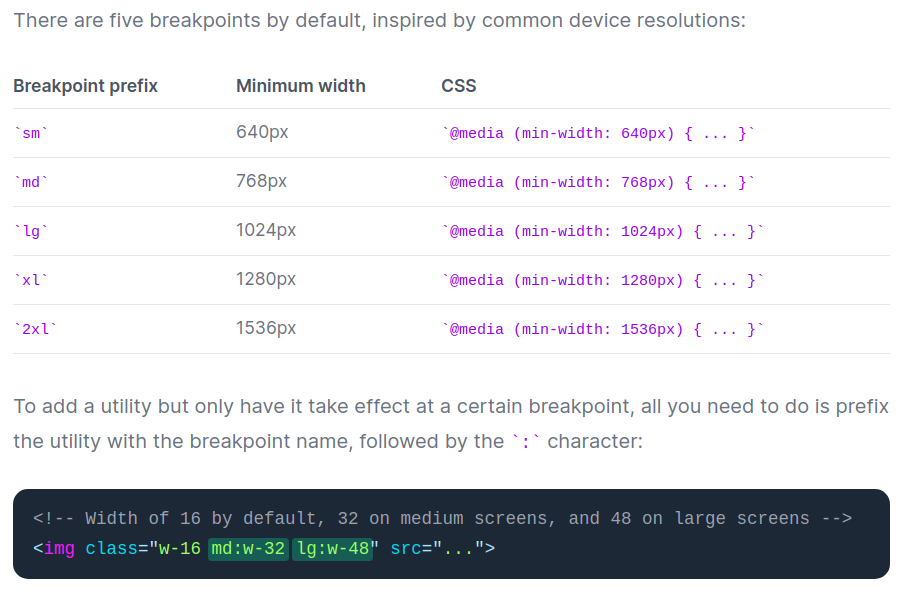
From Tailwind CSS official website.
11–20 hours on the project: initial backend and front-end routings
It was time to work on the backend side of the app. So, I decided to start with 4 recipe routes, which were:
- GET /recipes/random — returns 6 random recipes for the front page
- GET /recipes/search —a general search to find any recipes
- GET /recipes/findByIngredients — searches recipes by ingredients
- GET /recipes/:id — returns a recipe based on its id
Creating the Node.js backend was simple enough since I only needed to target Spoonacular’s API for those routes. Once users got involved then it would be more complicated. I haven’t yet implemented a database system since I still haven’t had the need to store or read anything outside of the API.
After I was done with the basic routes, then it was time to move to the front-end side of the app again. This time I utilised the server that I made instead of fetching Spoonacular’s APIs straight from the client-side — it’s such a bad practice to put an API key on the client since there’s no [easy] way of concealing it once it got deployed.
I noticed that my loading screen looked ugly so I implemented React Loading Skeleton. I also needed to make the user able to go somewhere once they click one of the recipes on the front page, but I forgot how the routing works on React so I watched Dev Ed’s React Router Tutorial to refresh my memory.
After that, I came up with these mockups for the recipe page.
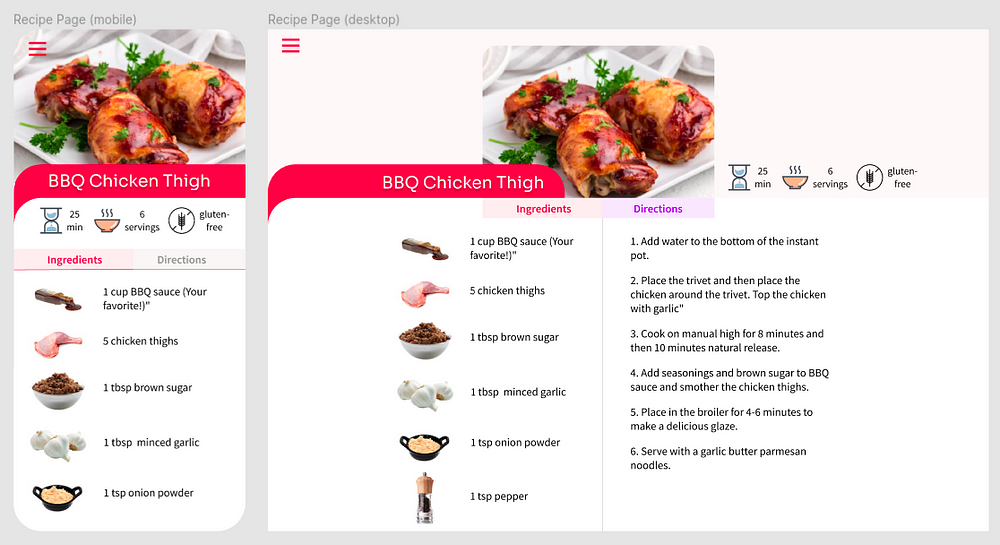
I wasn’t entirely sure whether I could replicate this completely but at least I was gonna give it a try.
Going off on a little bit of tangent: talking about perfectionism
So, I realised that I’ve spent almost 20 hours over the span of two weeks and I’ve only got my main page to show whereas now I only started working on the recipe page. I could excuse myself by saying that my front-end skills were quite rusty since I haven’t worked on them for almost a year, but then if I was being honest my main culprit was perfectionism which made me keep revising and revising the look of the front page just to get it exactly how I wanted it to be. Just at that moment when I took a break, I stumbled upon Thomas Frank’s video about how perfectionism destroys productivity.
My main takeaways from his video:
- Being a perfectionist doesn’t make me better at my job. I need to get a lot of feedback to get better and to get a lot of feedback I need to produce more work. To do that I need to set some realistic expectations for myself and my products.
- I need to decide how to allocate my time better. So, instead of nitpicking every small detail until I got all of it right, I need to decide what actually matters and focus more of my efforts on those things.
- I should expose myself to imperfections on purpose. Set some deadlines and focus on quantity over quality. For example, Jennifer Dewalt challenged herself to make a new website every day for 180 days. And here I was struggling with one page for two weeks!
Another relevant post that talked about perfectionism was the Parable of the Pottery Class from Ali Abdaal’s personal blog.
There was once a pottery teacher called Brian. One month, he decided to split his class into two groups. Group A had to make a pot every day for 30 days (so 30 pots in total). Group B had to work on a single pot for the whole 30 days.
At the end of the month, Brian judged the quality of the pots. Without exception, every one of the top 10 pots came from Group A, the guys that made one pot per day. None came from the group that focused on perfecting their single pot.
All in all, I needed to accept that as a beginner I was going to suck, and to get better I should be focusing on quantity over quality.
21–30 hours on the project: search and pagination
I added a vertical translate on the card component to make it move up on a user’s hover. There was a small issue, though. The hover action was jittery and whenever I hover on the lower edge of the cards it continued to move up and down and up and down again, all in less than a second.
It was so annoying and I tried out several recommendations from StackOverflow but none of them worked until I found this solution. What a lifesaver, and all I had to do was add an ::after selector with the above CSS properties on card hover.
Then I implemented the search feature but I encountered a problem where I couldn’t go anywhere after entering my search queries. Apparently, I only needed to utilise useHistory() and then use history.push(<endpoint>) from the SearchBar component.
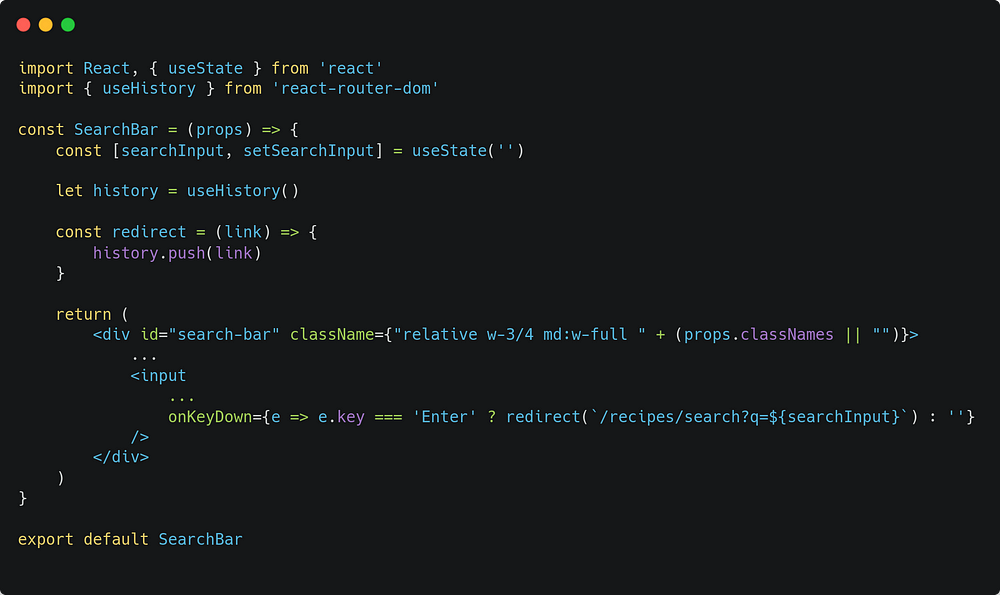
My SearchBar component now.
The next thing after redirecting the user to the search results was to extract the query on the search page to fetch the recipes, and to do this I used new URLSearchParams(props.location.search).get(<query>). I could also use useLocation() hook as described here. They both basically do the same thing, but I was more inclined to use the hook if I couldn’t get props.location from the component.
After the search results were fetched I also needed to paginate them, and despite how easy pagination might’ve seemed it just wasn’t that simple, especially when you encounter a stupid mistake.
I wanted to make the arrow button left disappears on the first page and the arrow button right disappears on the last page. For the first page, I just added the class “invisible” to the arrow button left if the currentPage is 1 like this:
<button
 className={"... " + (currentPage === 1 && "invisible")}
 onClick={() => redirect(`/recipes/search/${page - 1}?q=${q}`)}
>
I also made a conditional class on the arrow button right like this:
<button
 className={"... " + (currentPage === totalPages && "invisible")}
 onClick={() => redirect(`/recipes/search/${page + 1}?q=${q}`)}
>
It looks straightforward and should just work as intended right? Except it didn’t. For a while, I struggled with the weird behaviour where the arrow button right just didn’t disappear on the last page. I checked the value of page and totalPages and they were exactly the same, so how come currentPage === totalPages weren’t equal to true?
Well, apparently it was a stupid mistake on my part where I set the currentPage initial value as an empty array.
const [currentPage, setCurrentPage] = useState([])
All I had to do was change the empty array to 1 or another number.
So, let’s see how the website looks after 30 hours.
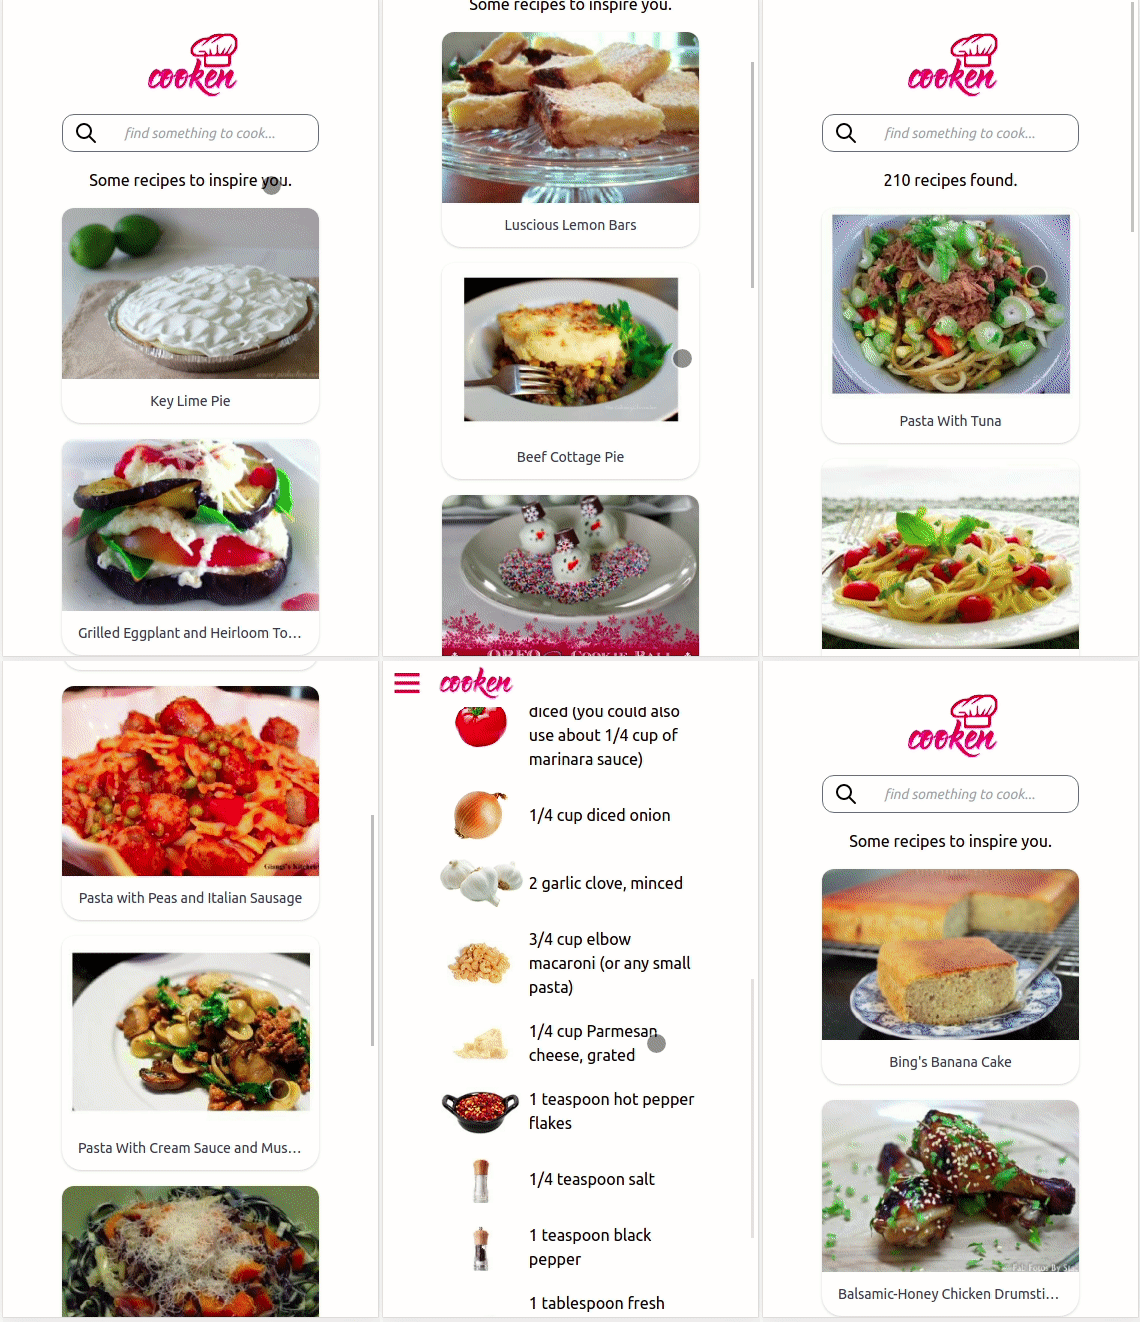
How it looks on a mobile screen.
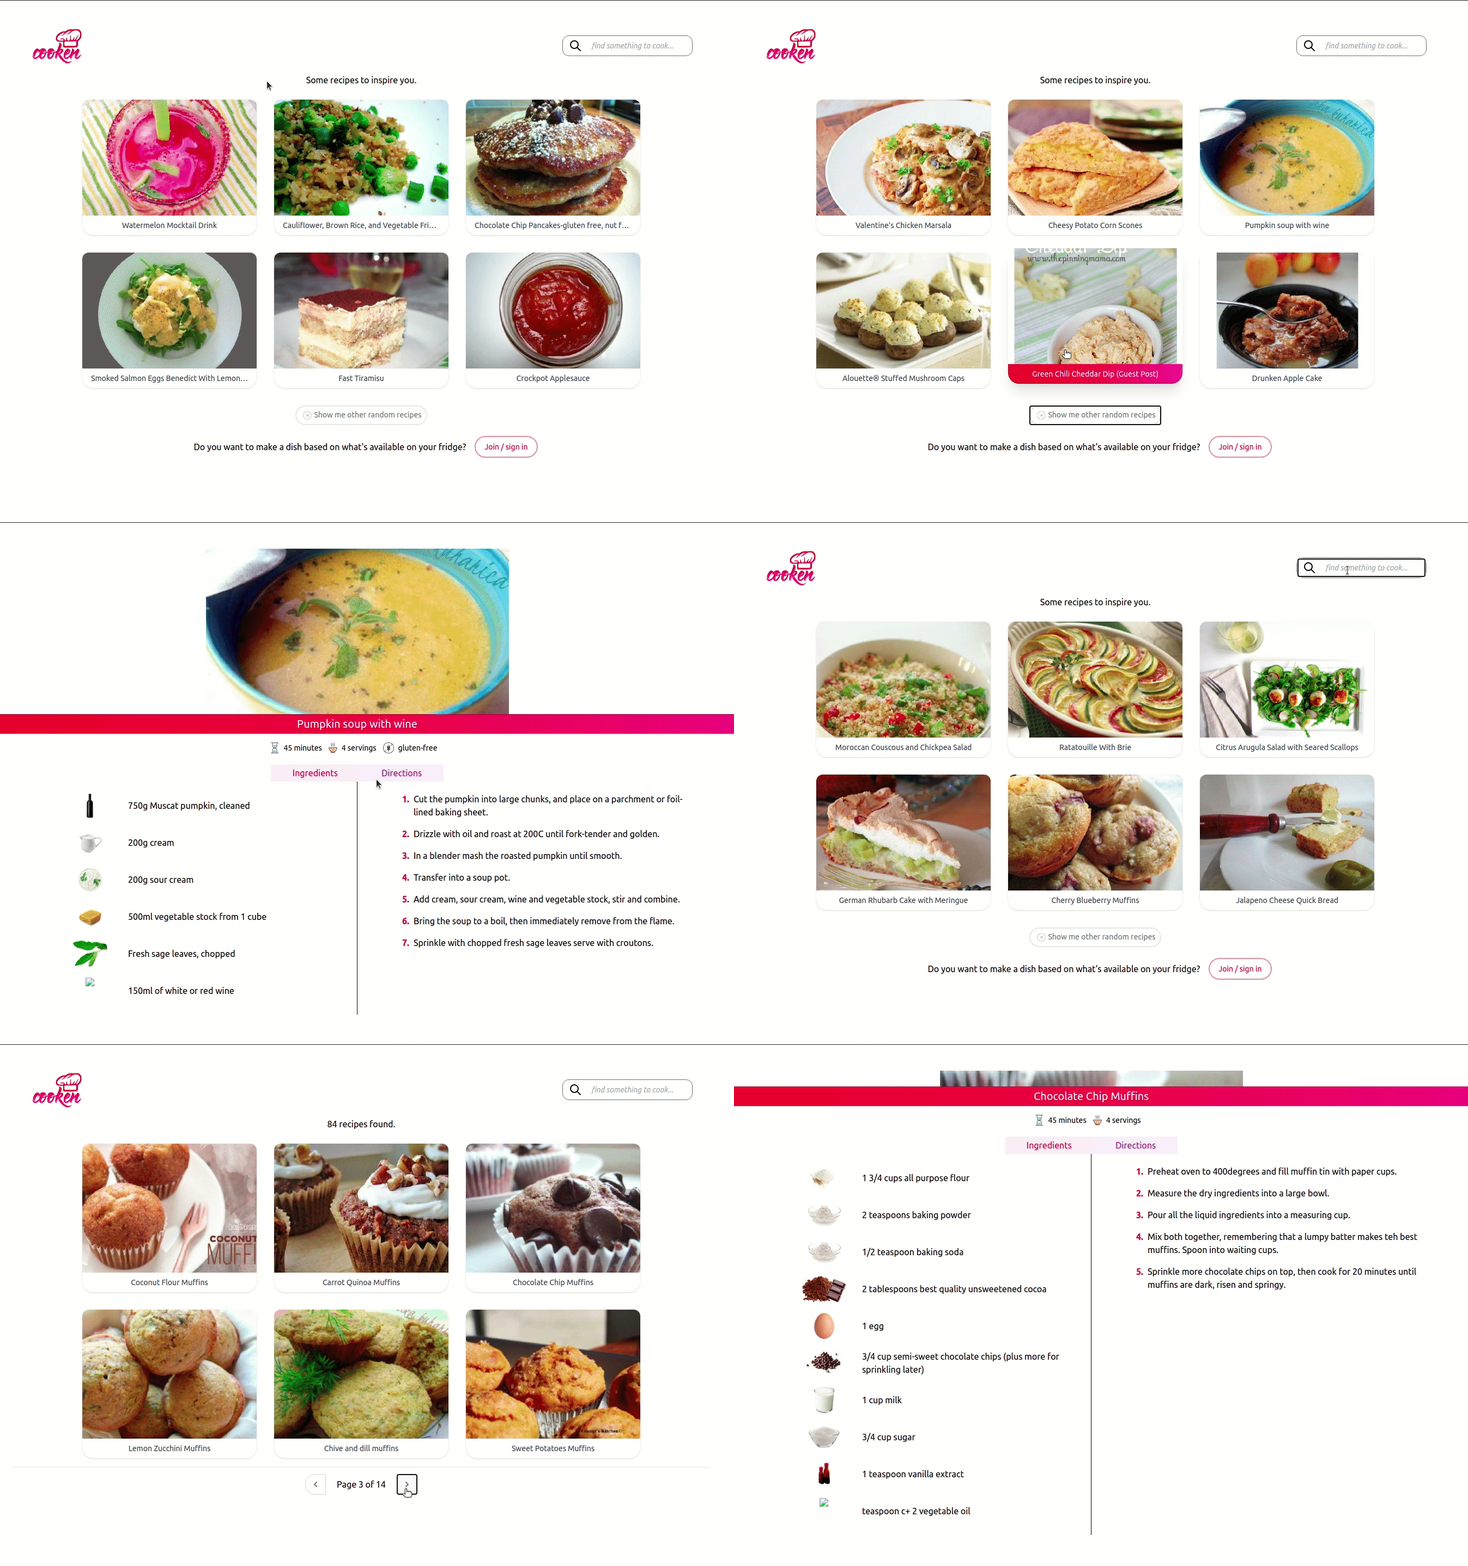
How it looks on a desktop screen.
I just need to remove the focus border that appears whenever I click on buttons and also make better skeleton loading screens, but overall, I’m happy with how it looks even if it deviated a bit from the mockups.
What I’m not happy about is that it took me 30 hours (over the span of 3 weeks) to create these 3 pages (home, search results, and recipe), but I expect to take a shorter amount of time on my next React project, especially if I’m gonna reuse my components and boilerplate codes.
31–40 hours on the project: setting the database and more API endpoints
After the public routes have been set up it was time to set up some user-only routes and work on the database. So, this was the database schema:
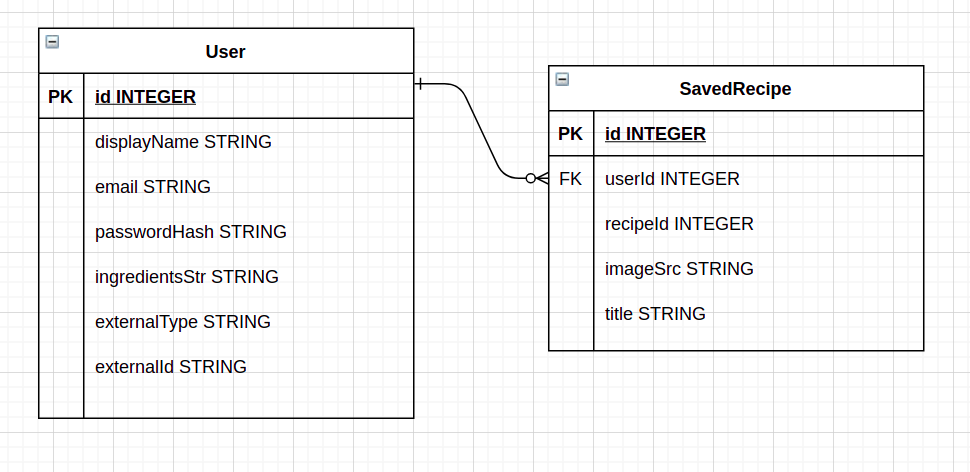
I added externalType and externalId just in case that I’m gonna add the option for users to log in from Google or Facebook
I also added one more recipes endpoint:
- GET /recipes/autocompleteIngredient — autocompletes user-inputted ingredients
For user I added 2 public endpoints:
- POST /user/login — returns an access token once a user successfully logged in
- POST /user/register — adds a new user to the database (and also returns an access token)
And 4 protected endpoints:
- PATCH /user/ingredients — updates user’s list of ingredients
- GET /user — returns user’s data (id, display name, email, list of stored ingredients)
- PATCH /user — edits user’s data (display name, email, password)
- DELETE /user — delete user from the database
I also added 3 savedRecipes (protected) endpoints:
- GET /savedRecipes — returns recipes saved by the user
- POST /savedRecipes — saves a recipe
- DELETE /savedRecipes/:id — deletes a saved recipe
To protect the routes and ensure that they can only be accessed by users I needed to implement an authentication and authorization system — I always got these two things mixed up.
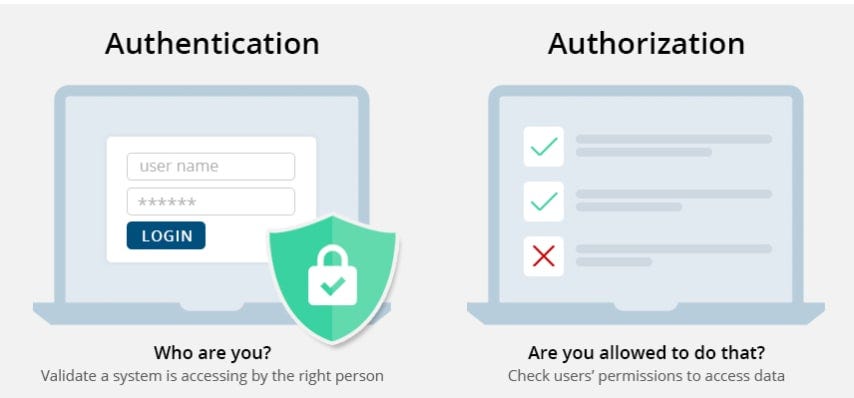
This illustration from dev.to kinda helped.
This JWT Authentication Tutorial by Web Dev Simplified really helped me relearn stateless authentication using JWT. Since this project is quite simple, I decided not to implement refresh tokens or separate the servers into an auth and resources server.
I also used localStorage as the place to put the access token, despite it not being as secure as storing the access token on httpOnly cookie, but I’ll get back to it later when I can.
41–50 hours on the project: join/login and save recipe for logged in user
So, for some reason, I kept encountering a warning like this.
Line 32:8: React Hook useEffect has a missing dependency: 'generateNewRandomRecipes'. Either include it or remove the dependency array react-hooks/exhaustive-deps
And it was because I didn’t put any dependency on my useEffect’s second argument and I just put an empty array there.
useEffect(() => {
   generateNewRandomRecipes()
}, [])
On the other hand, if I don’t pass any second argument or if I include generateNewRandomRecipes function as a dependency then it won’t stop getting fired. So, I looked it up on StackOverflow, and apparently, the simplest solution is to just use the function as useEffect callback like this.
useEffect(generateNewRandomRecipes, [])
I could also memoise generateNewRandomRecipes function using useCallback but for this case, I just picked the simplest solution.
After that, I made the join/login page. After a user logs in they’ll be redirected to the home page where the recipes now appear with a save button. One small issue I found when implementing the save button was that whenever the button was clicked the user will be redirected to the recipe page.
This happened because a child’s onClick event would also trigger its parent’s onClick event. To stop this I implemented stopPropagation, which prevents further propagation of the current event in the capturing and bubbling phases. Then I also installed react-toastify to display the success message, so my handleSaveRecipe function now looks like this.
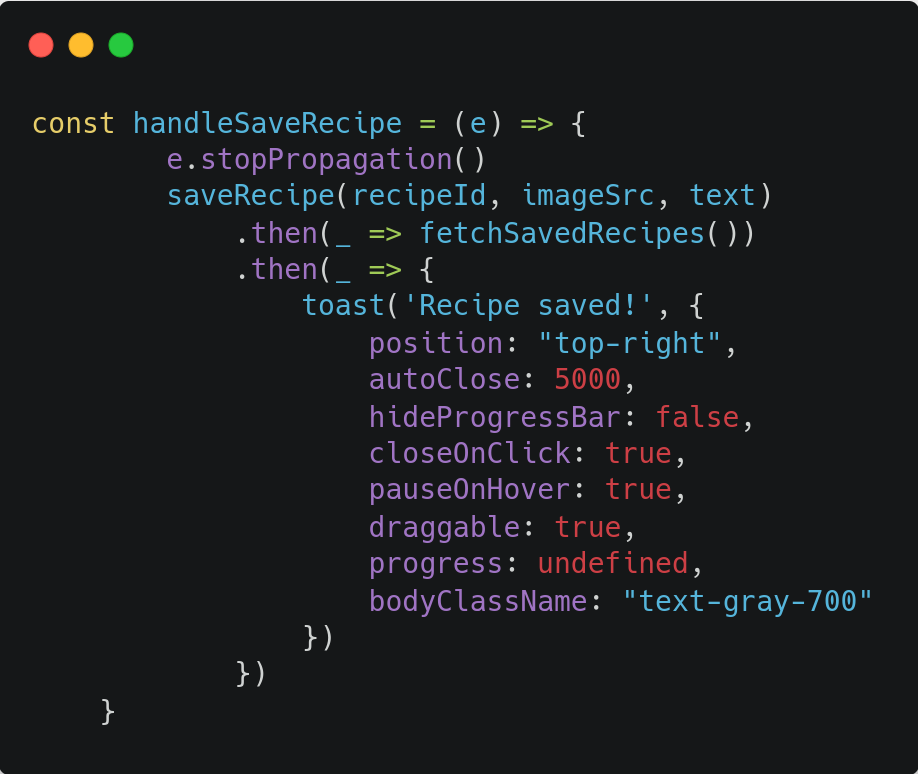
Anyway, I finished with the join/login page and now it looks like this on a mobile screen.
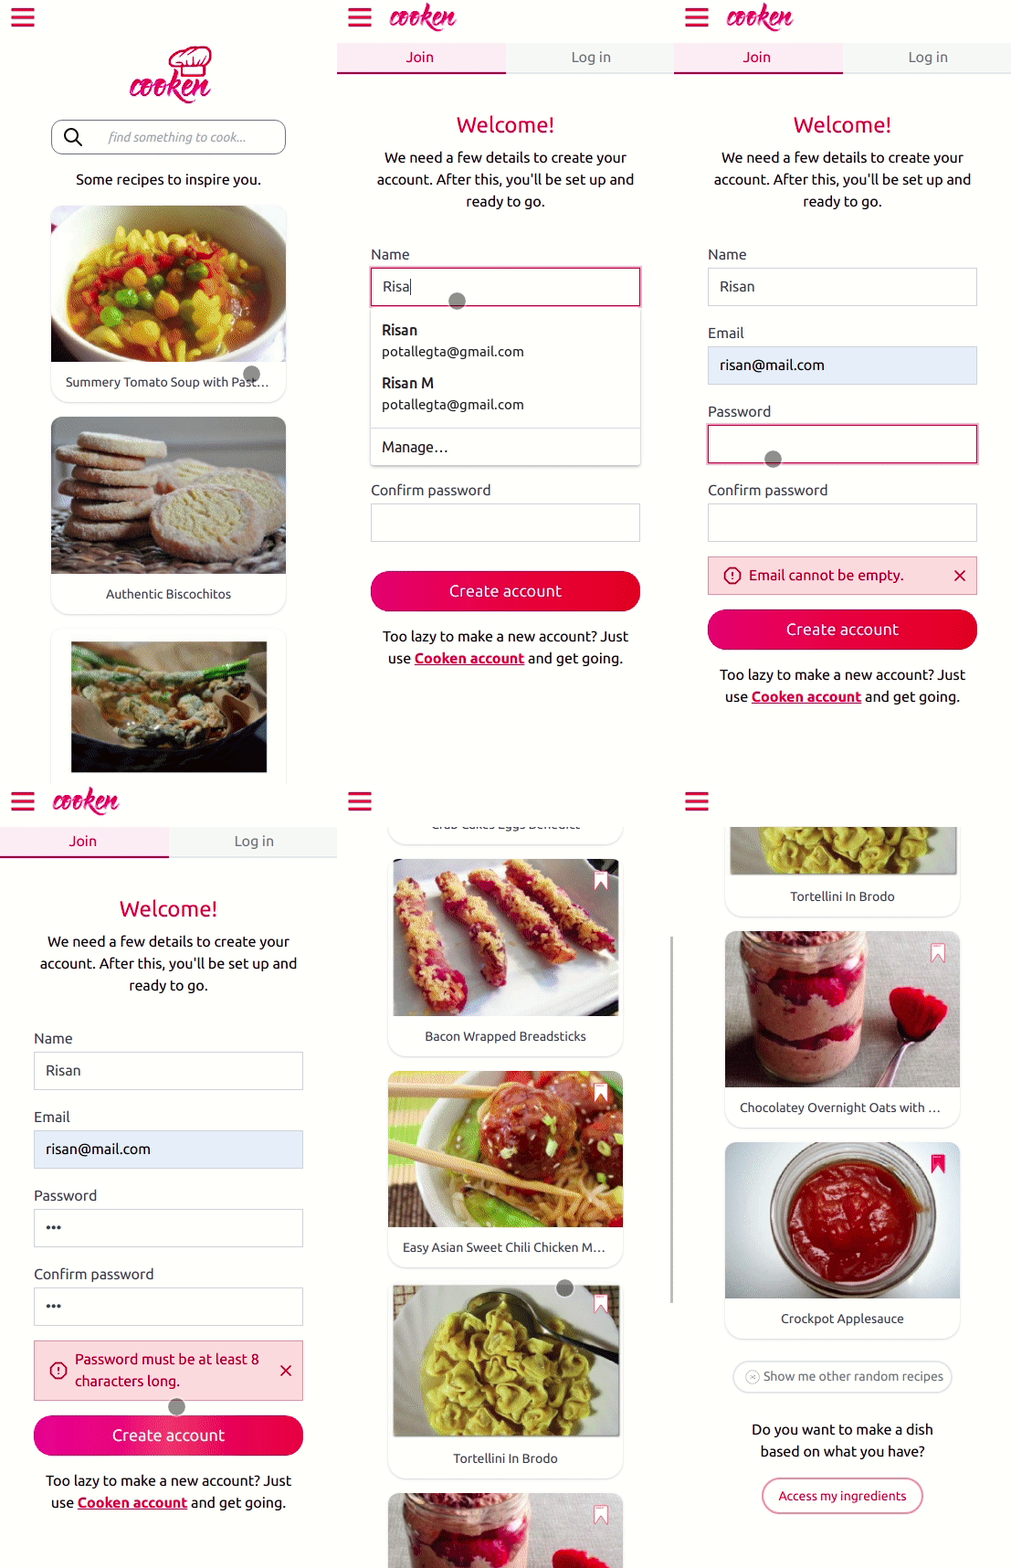
And it looks like this on a desktop screen.
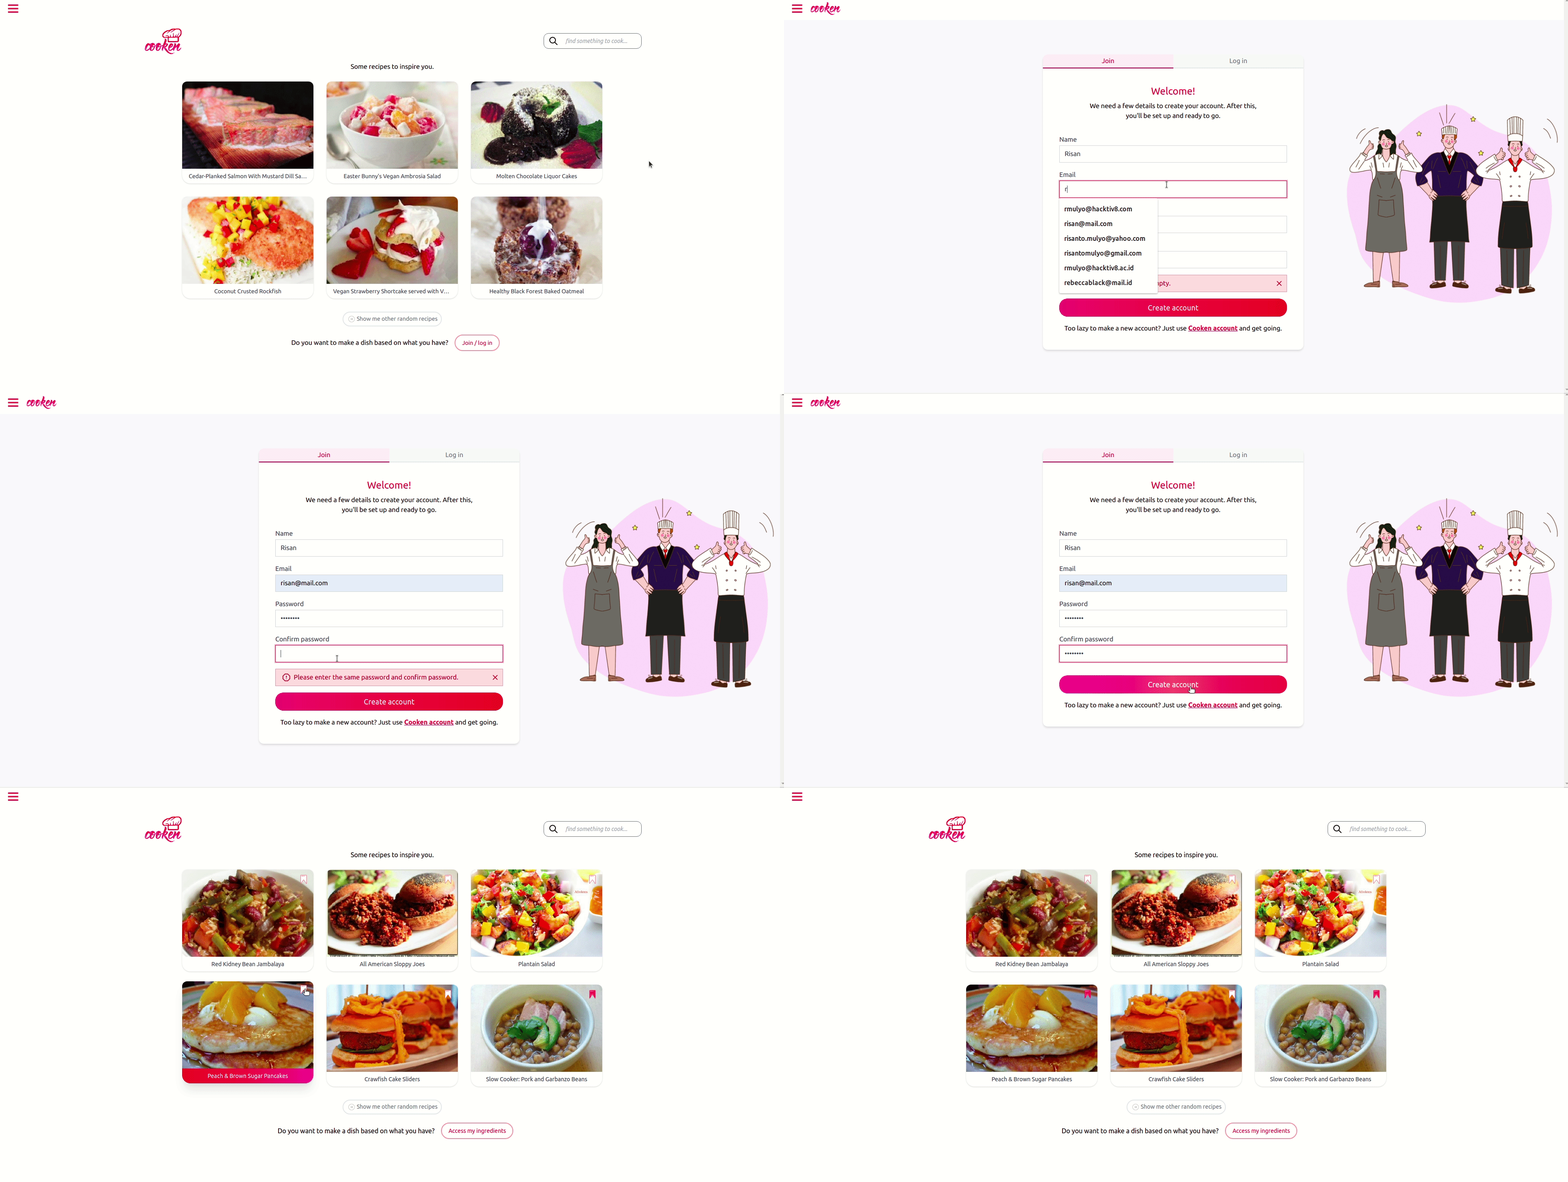
51–60 hours on the project: autocomplete and MyIngredients page
After save recipe feature was implemented, I started to work on the autocomplete ingredient feature on the MyIngredients page. In detail, what I needed to do was:
- Bind the input element’s value with a state that will change based on the user’s input.
- Display several suggestions based on what user types in.
- Makes the suggestions hoverable, clickable, and are navigable using the arrow keys.
- Implement enter/click to finalise the ingredient name to be stored in the user’s list of ingredients.
In the end, the input tag looked like this:
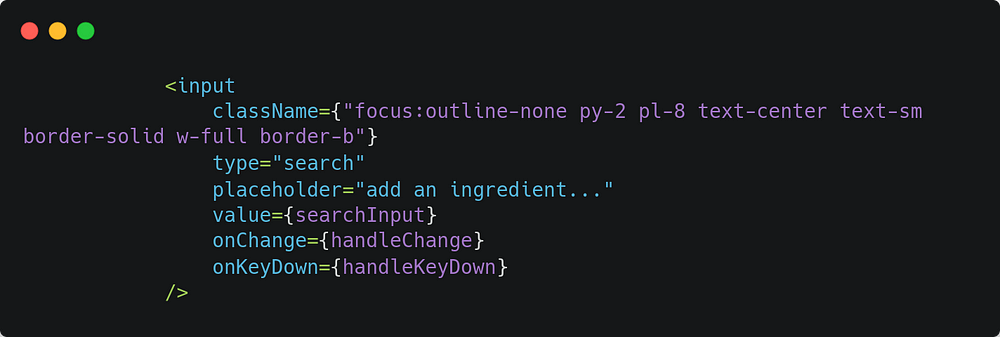
And the handleChange and handleKeyDown function looked like this:
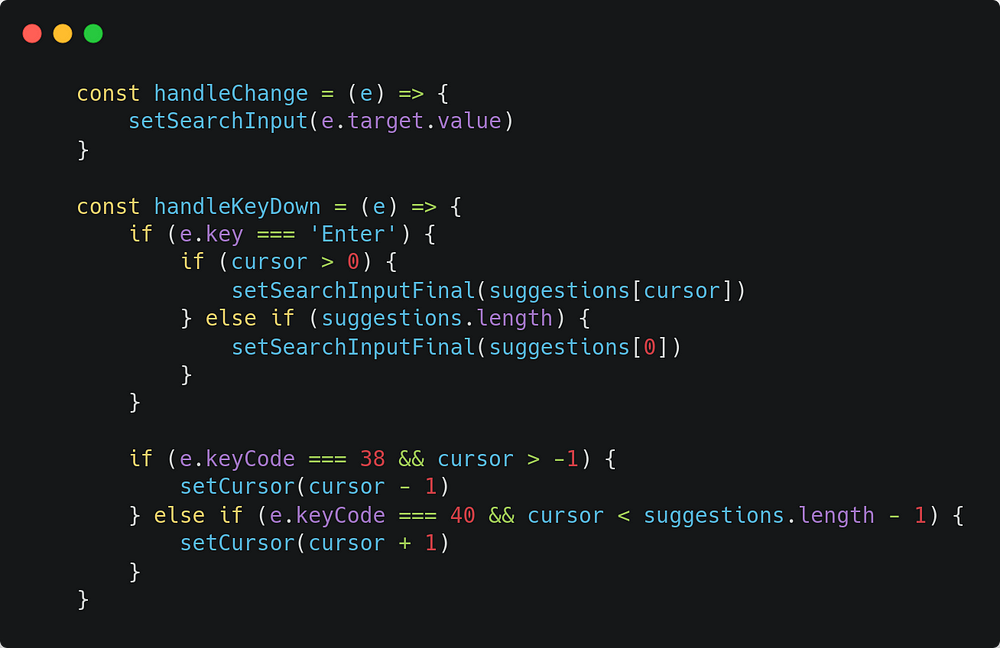
The handleChange function will ensure that whatever the user types in will updates the searchInput state, whereas the handleKeyDown function will decide with suggestions are being committed and inputted to the user’s list of ingredients. Anyway, this StackOverflow entry really helped me in nailing the handleKeyDown logic.
After the autocomplete function was done, I moved to fetching the recipes based on the ingredients that the user has. Then I grouped and sorted the recipes based on the number of user’s ingredients that are being utilised. To do that I made this helper function:
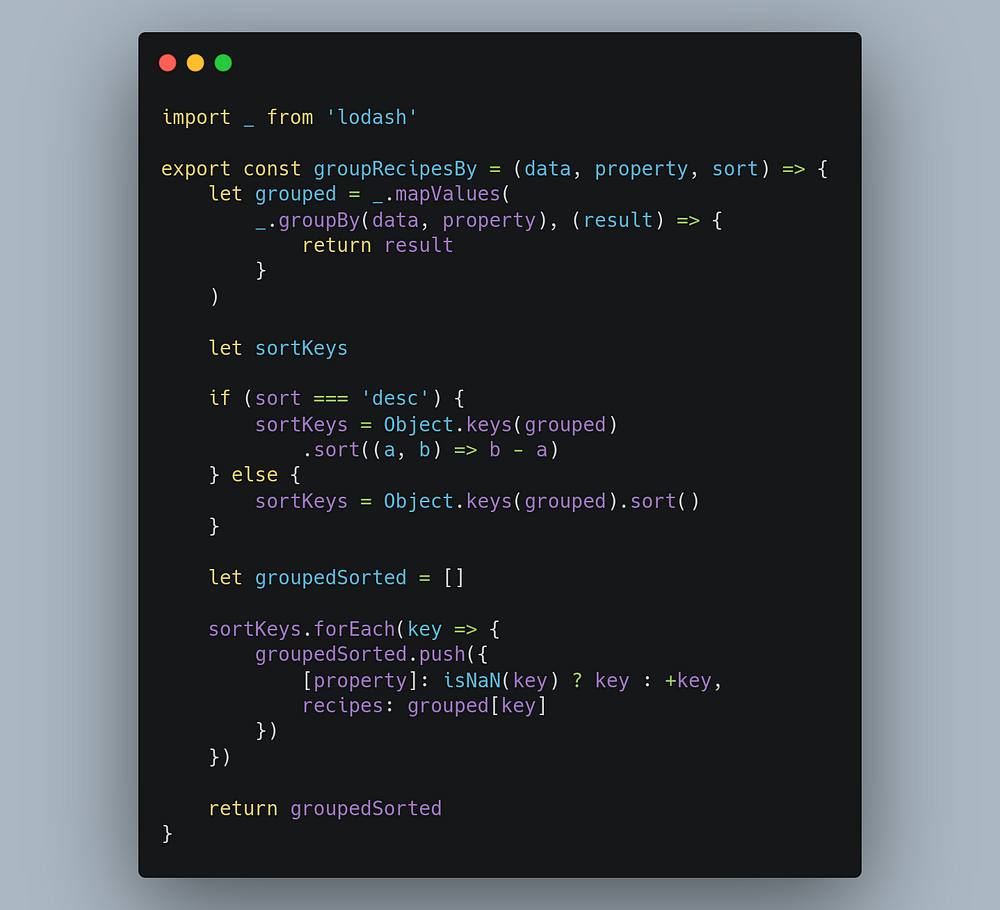
The code utilised lodash’s groupBy to group an array of objects based on the value of a key/property and then sort the array descending or ascending.
Anyway, the website now looks like this on mobile.
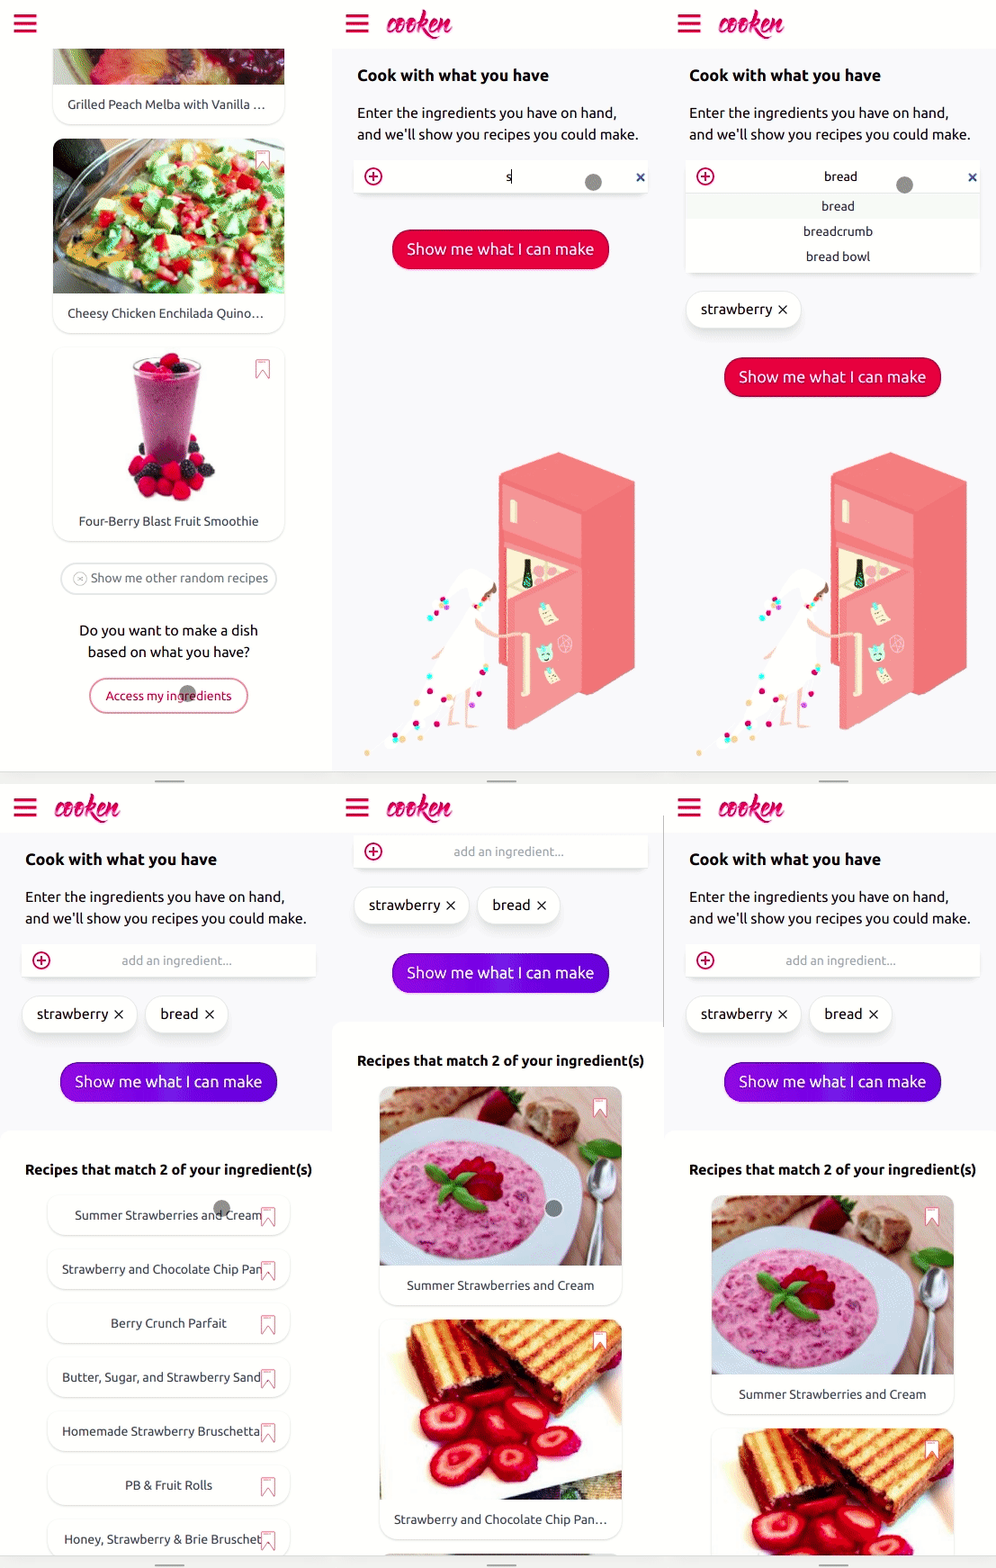
And it looks like this on bigger screen.
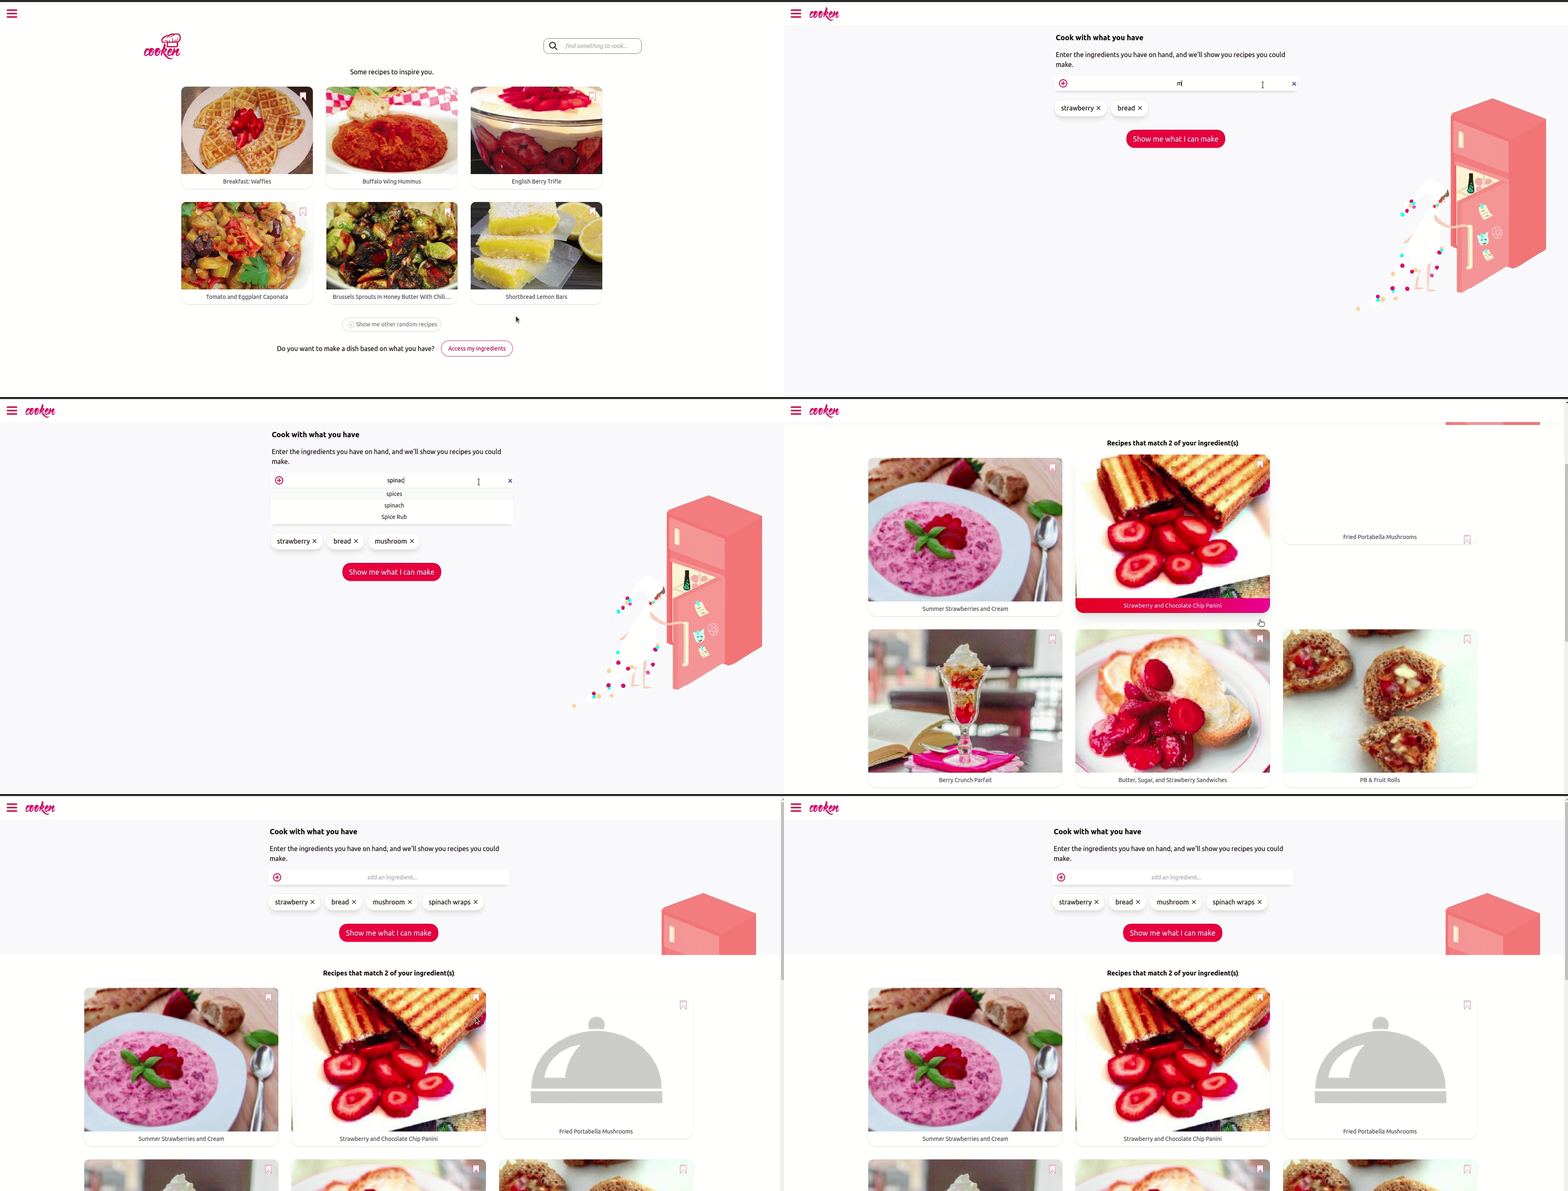
Now it’s time to move on to SavedRecipes page.
61–70 hours on the project: navigation drawer and deployment
After I finished all of the pages I added a navigation drawer which appears whenever the hamburger button is clicked. This drawer will also be closed automatically whenever it’s clicked outside.
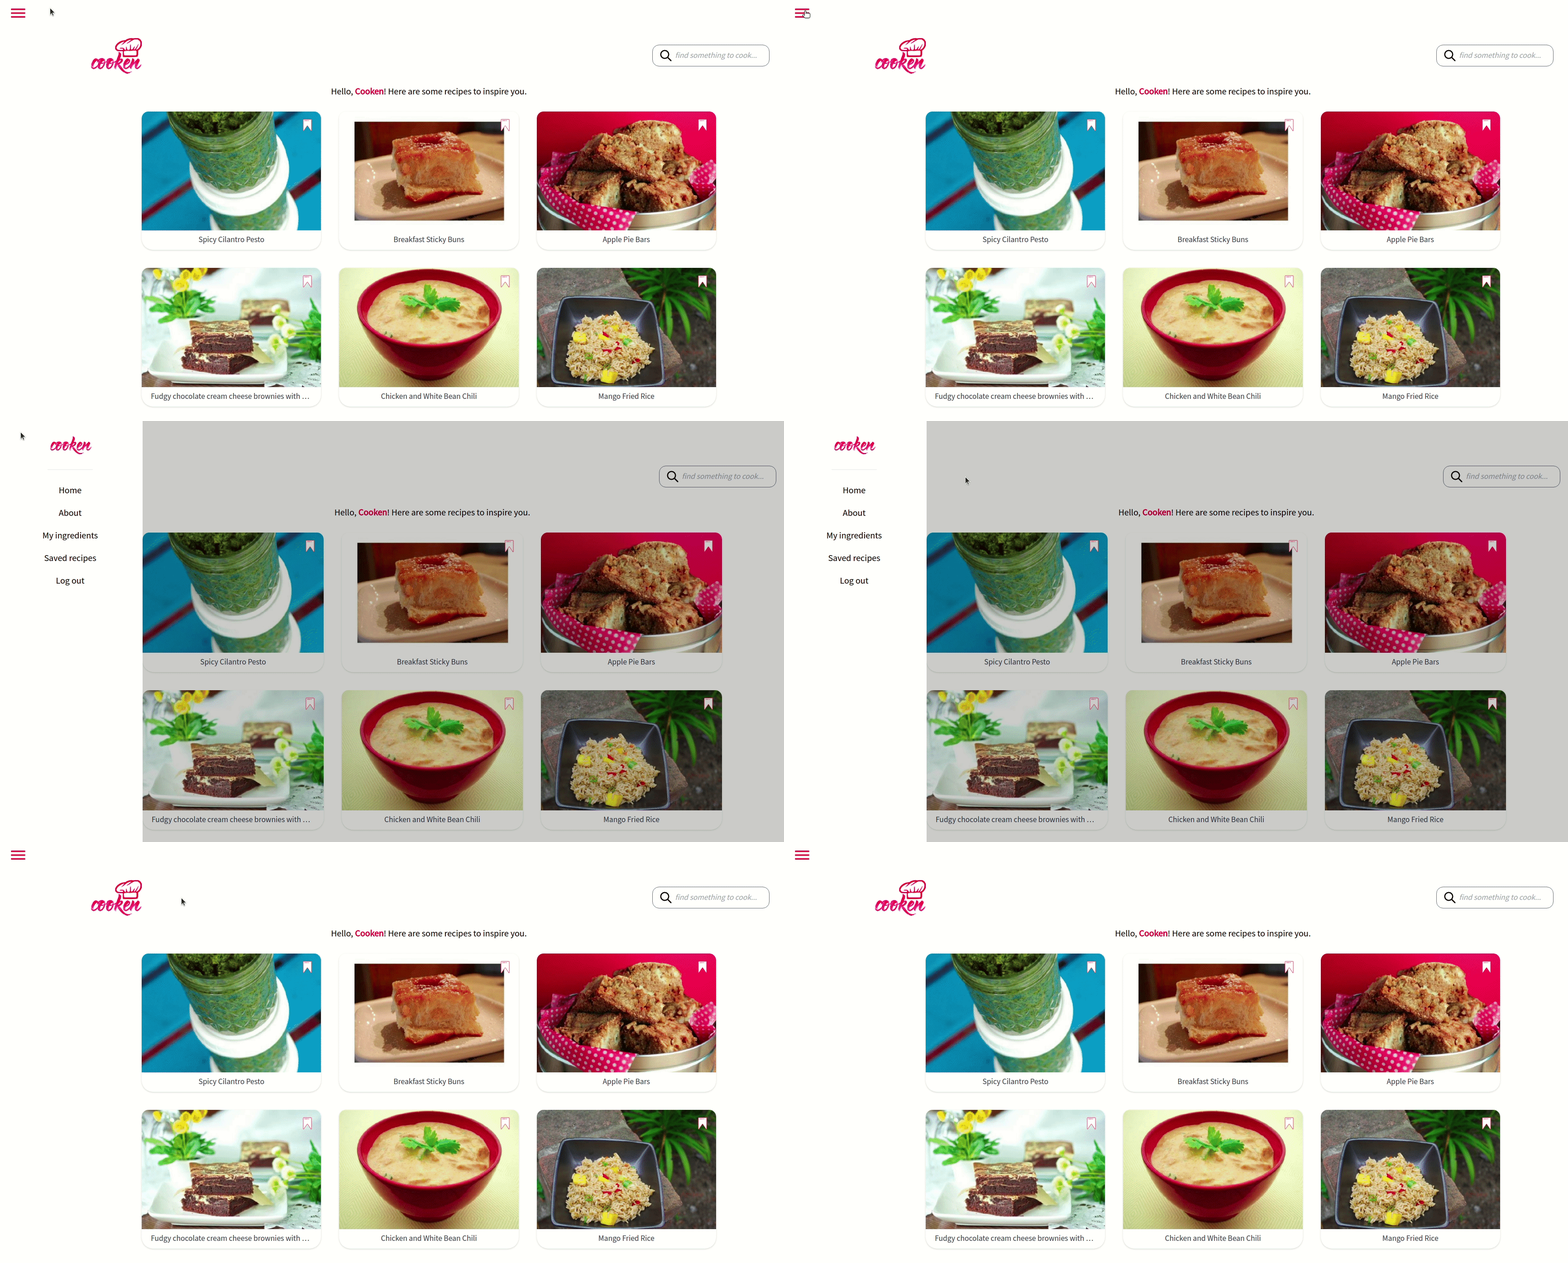
Now that the minimum viable product was finished, it’s time to deploy. I deployed the server to Heroku and the client to Netlify. Because I used the same repository for both server and client, I had to deploy the server using this command: git subtree push --prefix server heroku main, so that it would push the folder server straight to Heroku without pushing the client.
After I was done with the server, there were still several things to do on the client, such as making the page scroll to the top when it changes endpoint, lazy loading images using the package react-lazy-load-image-component, I also changed the router from BrowserRouter to HashRouter to deal with the reloading issue.
71+ hours: optimisation and wrapping up
The app was successfully deployed and all I needed to do was optimise it. I used Lighthouse to check the app’s score and applied some of its suggestions. I learned to use link preconnect and DNS prefetch so that it’d establish network connections early and sped up the fetching of the assets from the server.
Overall, I’m happy with how I finished the app and I relearned a lot of things about React while also learning about many new things. There are of course many things that can be improved but I got to learn about how fun it is to create a personal project, and how a simple app might not look that simple to make. I also learned to utilise React Context even though my usage of it in this project is quite experimental and I might need to refactor it in the future.